When a standard dialog is too simple for your plug-in, you can build your own dialog using the Dialog class. Earlier, we saw how the readme tool contributed an "Open Readme Browser" action in an action set. This action set is shown in the workbench tool bar and Window->Readme File Editor menu.
Now we are ready to look at the implementation of this action in the readme tool's WindowActionDelegate.
   public void run(IAction action) {
      SectionsDialog dialog = new SectionsDialog(window.getShell(),
         ReadmeModelFactory.getInstance().getSections(selection));
      dialog.open();
   }
The window action delegate for the action set uses the current selection in the resource navigator view (the .readme file) to get a list of sections in the readme file. This list and the workbench window's shell are passed to the SectionsDialog.
When the user selects the action, the SectionsDialog is opened.
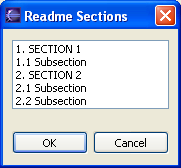
The SectionsDialog is implemented in the readme tool plug-in by subclassing the Dialog class in the org.eclipse.jface.dialogs package.
The Dialog class provides basic support for building a dialog shell window, creating the common dialog buttons, and launching the dialog. The subclasses are responsible for handling the content of the dialog itself:
The SectionsDialog creates an SWT list to display the list of sections. It uses a JFace viewer to populate the list. (We'll look at JFace viewers in Viewers.) Note that our dialog does not have to create any of the buttons for the dialog since this is done by our superclass.
   protected Control createDialogArea(Composite parent) {
      Composite composite = (Composite)super.createDialogArea(parent);
      List list = new List(composite, SWT.BORDER);
      ...
      ListViewer viewer = new ListViewer(list);
      ...
      return composite;
   }
   protected void configureShell(Shell newShell) {
      super.configureShell(newShell);
      newShell.setText(MessageUtil.getString("Readme Sections"));
      ...
   }
Dialogs can be as simple or as complicated as necessary. When you implement a dialog, most of your dialog code is concerned with creating the SWT controls that represent its content area and handling any events necessary while the dialog is up. Once a button is pressed by the user, the dialog can query the state of the various controls (or viewers) that make up the dialog to determine what to do.
In some cases, you might want to show information about something in a dialog, but in a way that is more "lightweight" than launching a regular dialog. For example, a dialog may be intended to provide transient information that can be easily dismissed, without taking the focus away from the user's work. If this is the case, you can use the PopupDialog class to implement the dialog. The look and feel of a PopupDialog is different than a regular Dialog in several ways. It does not have any buttons across the bottom, it does not have the standard window title bar, and its borders, spacing, and fonts are smaller and more compact.
Although a PopupDialog looks very different than a regular dialog, the code in your plug-in's subclass that defines the dialog content is almost the same. You still implement the createDialogArea method to create the SWT controls for the dialog. The main difference in the application code is that the constructor that creates the dialog has many more parameters than the regular Dialog class. For example, the SectionsDialog could be turned into a PopupDialog by simply changing the superclass of the dialog and configuring the dialog in the constructor:
   public class SectionsDialog extends PopupDialog {
      protected IAdaptable input;

      /**
      * Creates a new SectionsDialog.
      */
      public SectionsDialog(Shell parentShell, IAdaptable input) {
        super(parentShell, SWT.DEFAULT, false, // do not take focus when opened
        	false, // do not persist the bounds
        	false, // do not show a resize menu
        	false, // do not show a menu item for persisting bounds
        	null, //  no title
        	null); // no info text
        this.input = input;
      }
      ...